Category: Root Cellar and Food Storage

Home / Category: Root Cellar and Food Storage

An image of an antique Enterprise brand hand-crank cherry stoner / pitter

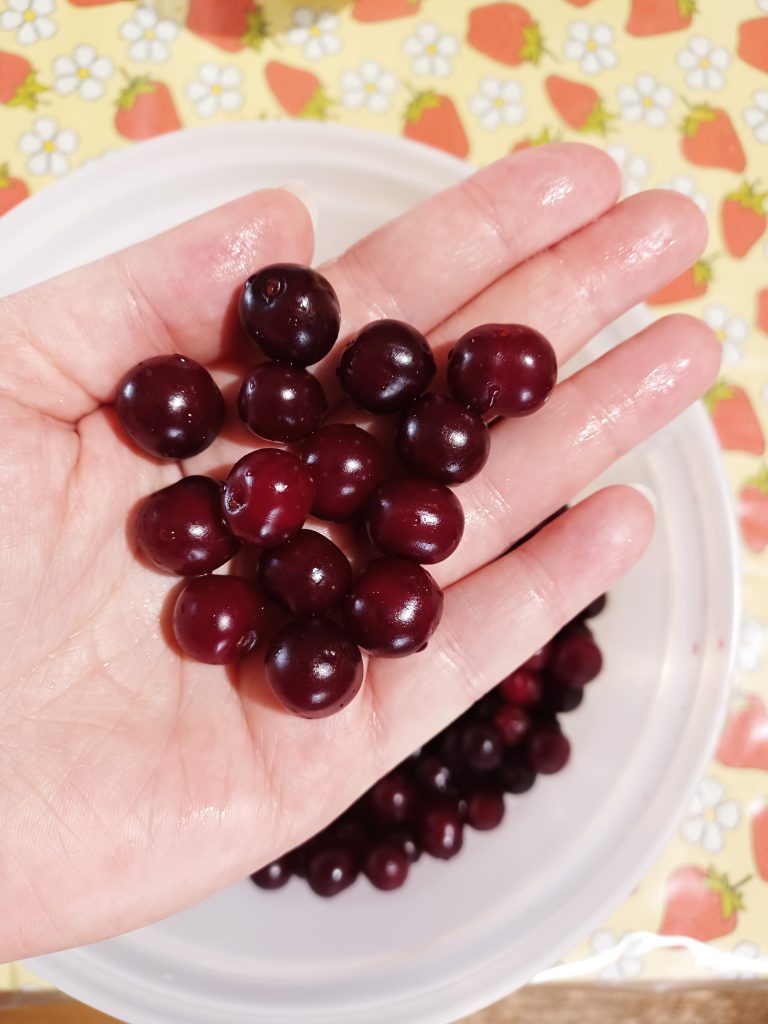
I love my sour cherry trees, and am happy to eat some of the cherries out of hand, but I like to preserve most of them for later use. Pitting sour cherries is a nuisance, though. I’ve purchased a number of cherry pitters over the years, but they seem to be designed for the much larger sweet cherries, and are ineffective and slow. My cherry ‘trees’ are all dwarf sour cherries from the University of Saskatchewan introductions, and both the cherries and the pits are considerably smaller than something like a Bing or Ranier.

With homestead-level volumes of cherries to deal with, a pitter that does one or four cherries at a time isn’t terribly helpful, even if they do manage to pit sour cherries effectively. So I’ve mostly preserved my sour cherry harvests by steam juicing them and making them into jelly, or by fermenting them into wine. While these are fine ways to preserve them, I wanted to be able to make pies, maybe a few jars of jam, and to freeze some cherries for smoothies.

A handful of ripe, dark red dwarf sour cherries, illustrating their size.

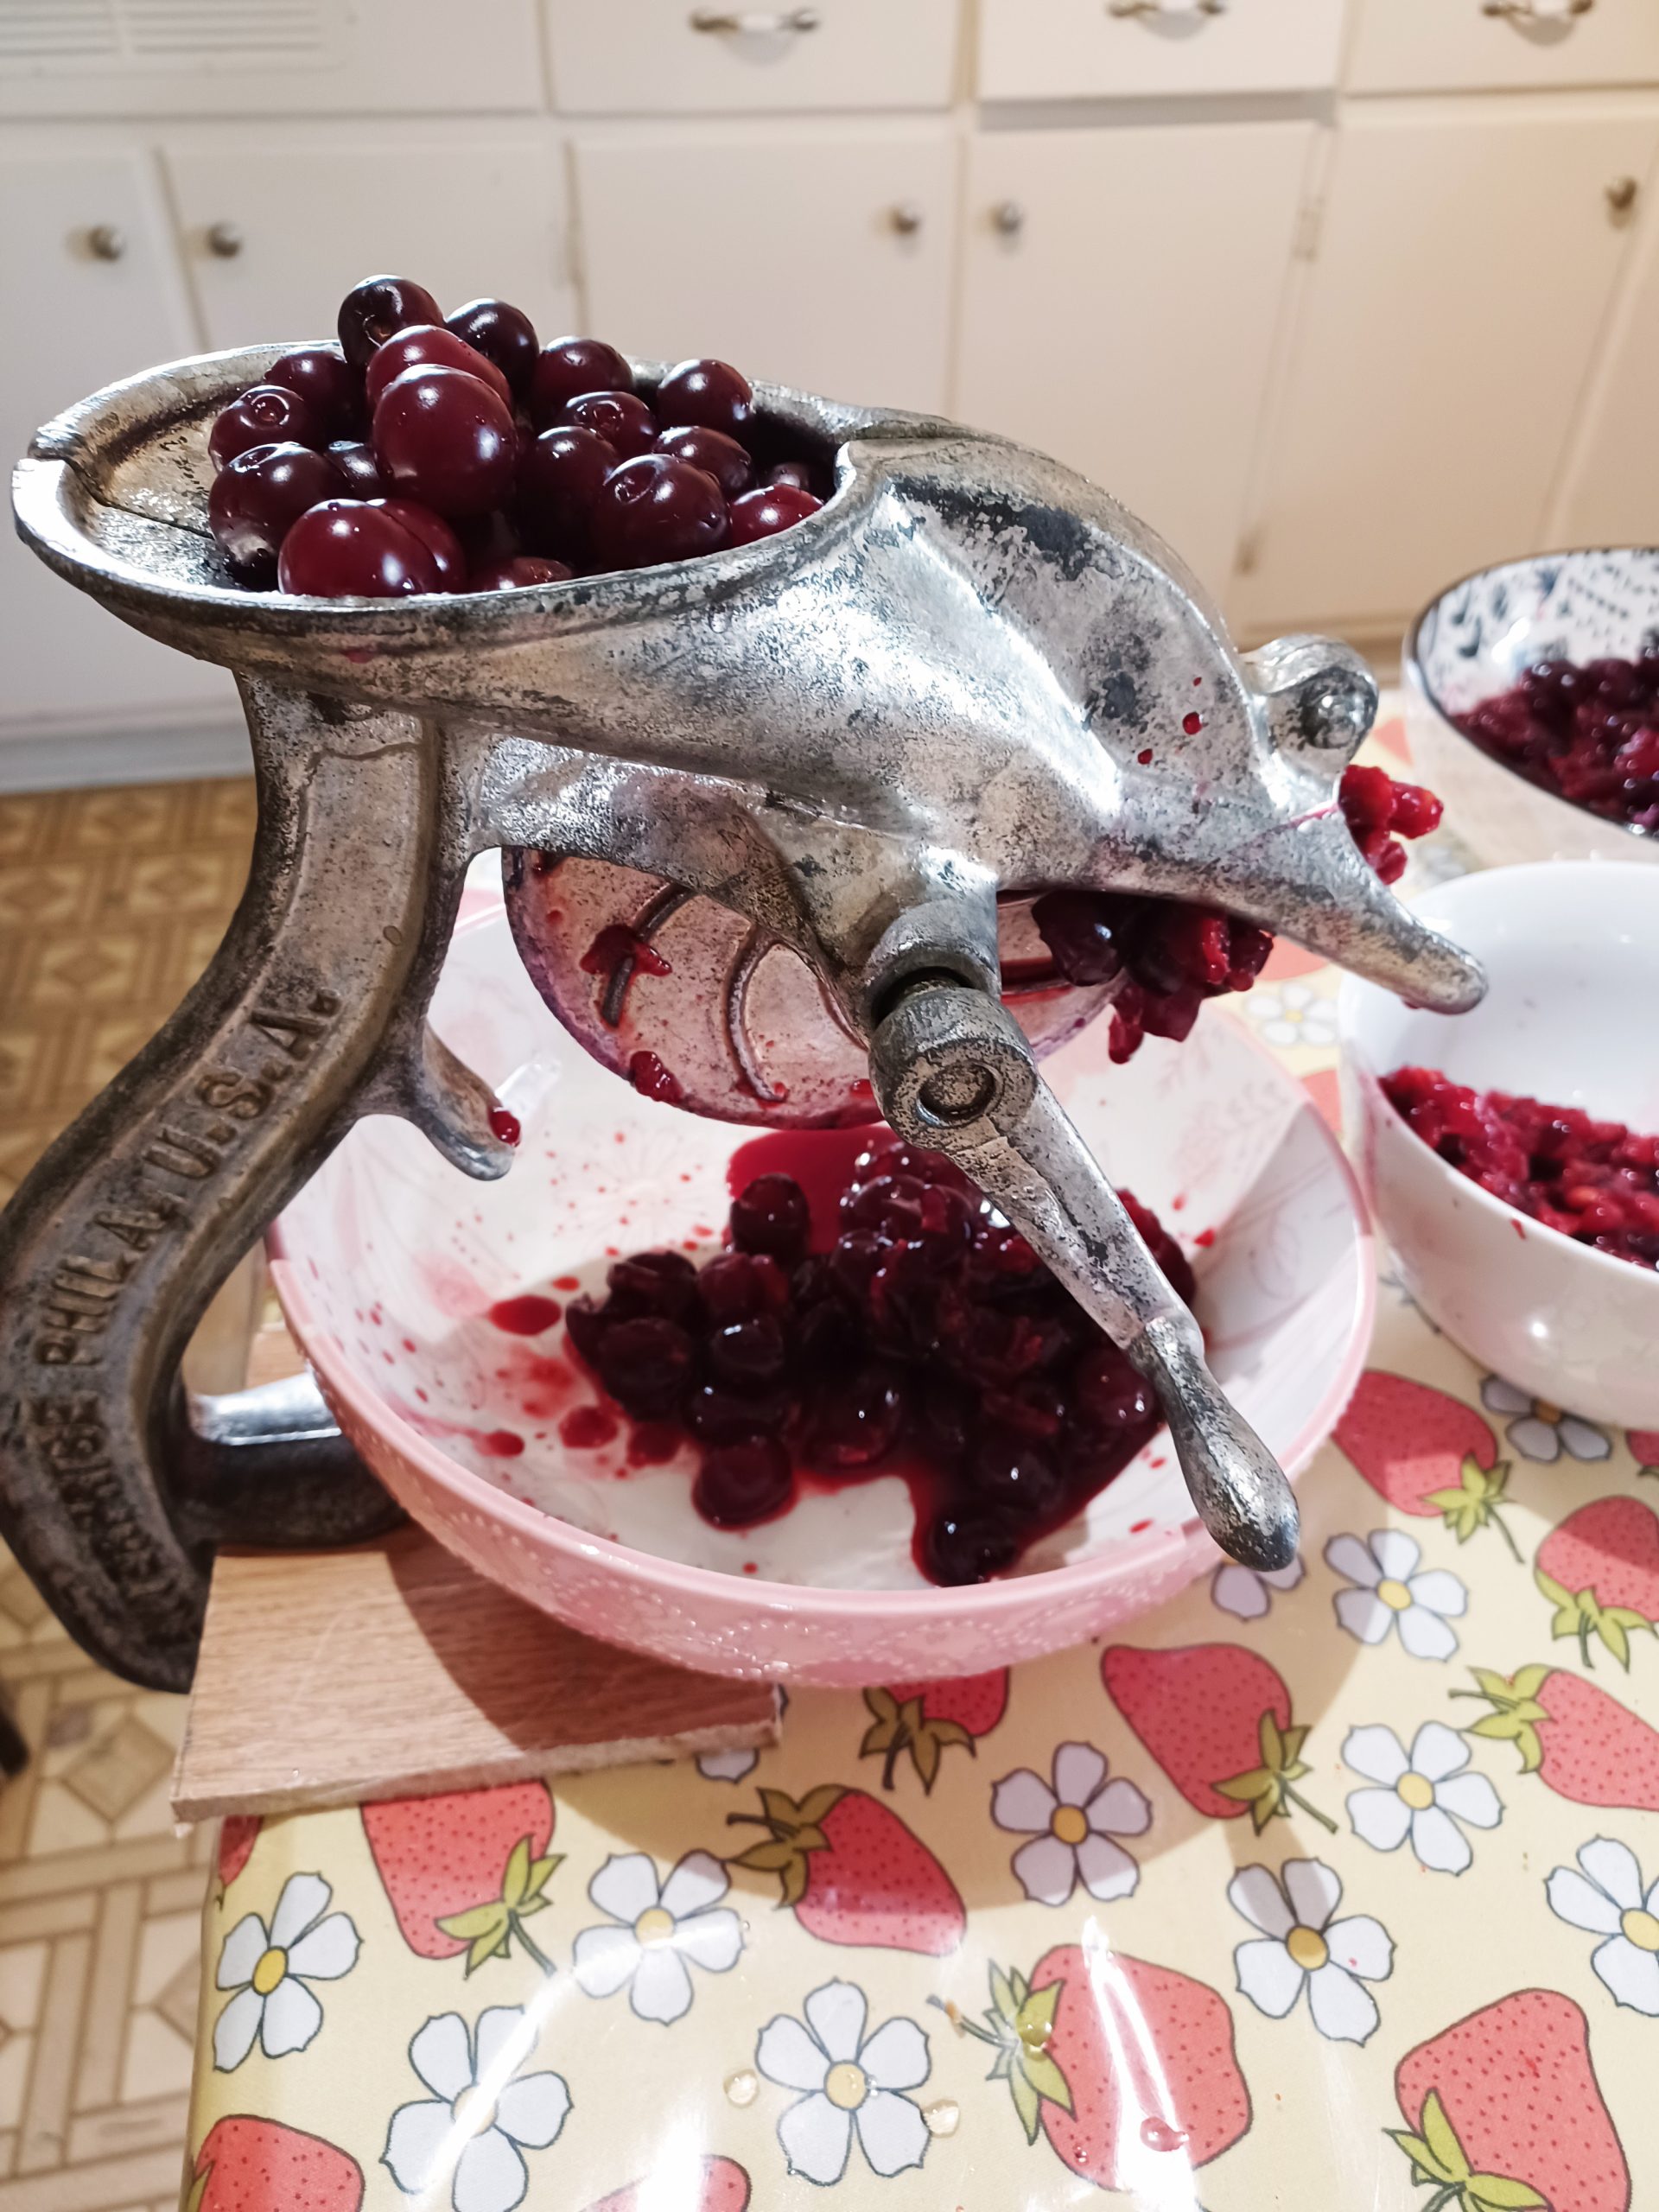
This spring, I ordered an antique hand-crank cherry pitter. The particular one I bought was an Enterprise No. 16 Cherry Stoner, but there were several similar ones. Home scale modern pitters all seem to use a plunger to push the pit out through the side of the cherry; these vintage crank pitters use a plate to push the cherry flesh through an opening that is smaller than the cherry pit. The theory looked sound, at least. I found a video of someone from Washington using a crank pitter, and again, it was very encouraging. I wasn’t sure it would work with my non-irrigated, prairie-grown dwarf sour cherries, though.

It’s been a very dry year, here, with plenty of heat, but very little rain. My cherries were ready a bit earlier than usual, and were on the small side. The harvest was also very small; my one mature tree only yielded four pounds, a little under a gallon of fruit. I harvested this week, and decided to try pitting my sour cherries using my new-to-me cherry stoner.

An image showing the set-up of the Enterprise No 16 Stoner, with cherries in the hopper, some pitted cherries in a dish, and another dish catching the pits.

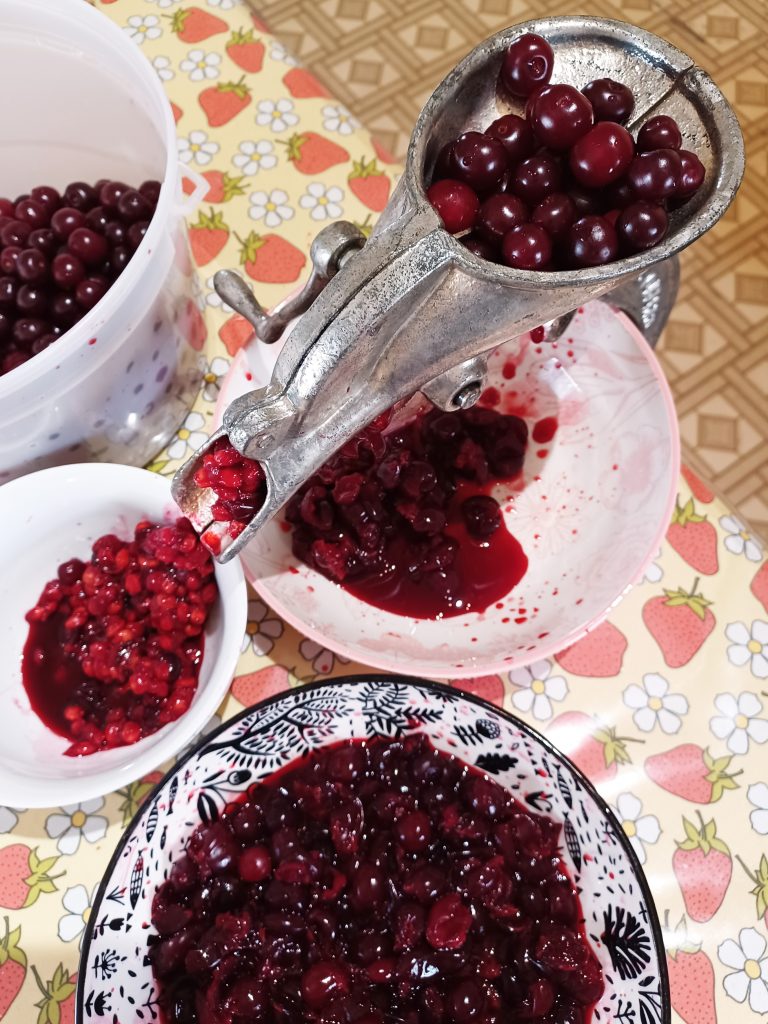
This thing is game-changing, folks! In under an hour, I had the stoner set up, pitted a gallon of cherries, packaged the fruit up for the freezer, and cleaned up the kitchen. Most of that time was set-up and clean-up; the actual pitting only took a few minutes. I was amazed!

I did notice that the stoner jammed from time to time, but backing the crank up a bit, or just fiddling for a moment was enough to set it right. With a hand crank and no blades or sharp parts, I wasn’t worried about sticking a finger down the chute to move a stuck cherry or pit. It also didn’t always feed very effectively, but again, a quick poke with a finger, and things got moving again very easily. For a piece of equipment that was over 100 years old, I was pretty impressed.

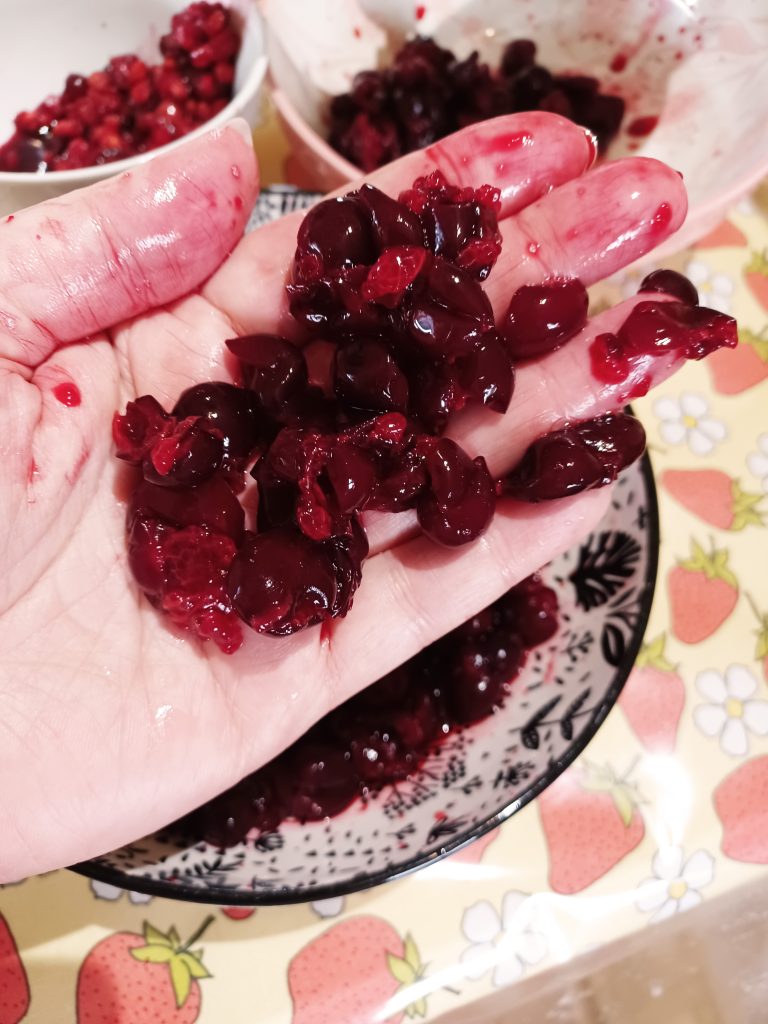
A fair number of the smallest cherries went right through, and did not get pitted at all, leading to a certain amount of waste, and there were also a fair number of pits in the pile of pitted cherries. I suspect at least some of this is because the drought-affected cherries (and their pits) are just so small this year. I figure it was about 5 to 10 percent of cherries that did not get effectively pitted. Having said that, it was easy to go through the pitted cherries and remove the ones that were missed, as the pits were exposed and easy to get at. Even with me going through the pile of pitted cherries twice to look for missed pits, the process was very quick. I couldn’t have run a full batch through the steam juicer in that amount of time!

An image showing the results of pitting the cherries, illustrating the small but significant amount of waste - several small whole cherries, as well as some flesh, ended up in the pile of pits.
There’s some waste – a few of the smallest cherries went right through and ended up with the pits.

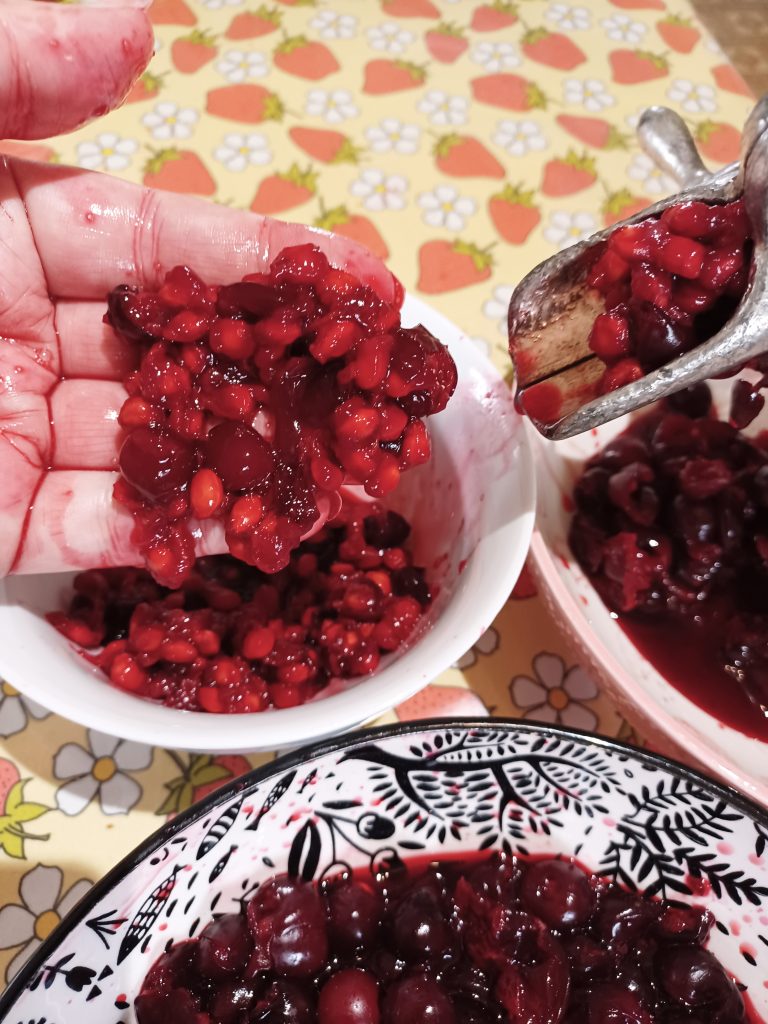
The only real downside to this pitter, besides the bit of waste in the pit pile, is that the cherries are pretty thoroughly mashed by the time they make it through the machine. To be honest, for my own uses, this is not an issue at all – nobody here cares what the cherries in their pie or jam look like. If you want pretty cherries for decorative uses, though, this won’t be a good solution for you.

A handful of pitted dwarf sour cherries after being run through the Enterprise No 16 Stoner.  The cherries are pretty mashed.
The pitted cherries are pretty mashed

For anyone else who has a few (or more than a few) sour cherry bushes, and wants to can larger volumes of pitted cherries or cherry jam, I really encourage you to find yourself one of these slick little tools. The drawbacks of a bit of waste and some fairly mashed up cherries are easily outweighed by the sheer speed of processing, even counting the time I spent going through the pitted cherries to check for missed pits. I can’t wait for a big harvest of sour cherries, now, and I’ll be canning up a ton of pie filling!

By Jess
A photo of winter squash curing

We grow a lot of squash. Our first couple of years here, we discovered that squash seems to like our particular climate, and is happy to grow here without a lot of fuss, as long as we pick a type that will mature in our very short season. Even so, we often find ourselves picking our squash before it is fully ripe, or sometimes even completely green, in order to avoid a hard frost. A lot of types of squash will store at cool room temperatures for a very long time, which makes it doubly attractive, as it doesn’t need to take up space in the root cellar or freezer. However, in order for it to last well, you need to cure winter squash, especially if you are picking it a little early.

A freshly harvested squash with a cut stem, that needs to be cured before long storage.
A freshly harvested winter squash, with the stem still soft, wet, and seeping. This squash needs to be cured!

What is curing? Basically, it is letting the green or under-ripe squash dry out a bit, thicken its rind, and be ready to sit on a shelf without rotting. How do you cure winter squash? Well, the first step is to pick it at the right time. While many types of squash will take a light frost, it doesn’t appreciate freezing. We try to pick our winter squash just before the first frost, but in our zone, that often means picking it before the stem has fully dried out. When we are harvesting, we make sure to cut the stems quite a way back, leaving a good ‘handle’. Don’t pick the squash up by this handle, though! You might break the stem off, which actually makes the squash more susceptible to rotting.

A partially cured winter squash stem.
A partially cured winter squash. Note the shriveled stem end, and the base of the stem starting to look dry and woody. There’s still a lot of green, tender stem, though!

After the harvest, we usually leave the squash outside on the lawn for a while to dry off, if it isn’t raining; otherwise, we take it inside and wipe it with a towel. Once the squash is dry, we brush off as much dust/dirt/mud as we can. Next, we dip the stem in a mild (about 5%, though I often eyeball it) bleach solution, and wipe down the outside with a cloth dipped in the same solution. Normally, we do this in a 5-gallon bucket in the tub, as most of our squash are small enough to easily dip in the bucket, and doing it all in the tub contains the mess a bit. For really large squashes, I dipper a handful of bleach water over the cut part of the stem and the base where the stem is attached to the squash. Then, I wipe the rest with a cloth dipped in the bleach solution. Once it has been dipped (or wiped), we towel the squash off again, using old towels, as the bleach can cause them to get discolored.

If you don’t have much time (or a good space to do any dipping in), at least make sure to get the cut part and the base of the stem wet with a bleach solution. This will kill off any bacteria that might get into the stem before it is cured, and make the squash rot prematurely.

Although I knew about the bleach thing for a long time, I resisted actually using bleach on my squash, as it seemed unnecessary and harsh. However, dipping the stems in bleach makes a huge difference in how long our squash store, so we do it every year, now. Bleach breaks down pretty quickly, and won’t be present by the time you eat the squash, plus you don’t normally eat the rind anyhow, so it is safe to do this.

freshly harvest winter squash, some under-ripe, laid out for curing
Freshly bleached winter squash, laid our in a warm, dry place to cure.

Finally, we lay out the squash on towels in a warm, dry space – normally we put them on the floor in the corner of our living room. We check it over and turn each squash every few days, to make sure all sides are being exposed to the air to dry. Squash prefers a cool, dry space for long-term storage, but you need to cure them properly, first.

How long should you cure your winter squash? It really varies, depending on the type of squash, how long you were able to leave it on the vine, how warm and dry your curing area is, and how wet or dry your growing season was.

A properly cured pumpkin stem.
A properly-cured pumpkin, The stem is dry, hardened, and woody, and the rind is thick, and can’t be easily marked with a fingernail.

We’ve found that hard-stemmed varieties like spaghetti squash and most cucurbita pepo species of pumpkins cure fairly quickly, often in a couple of weeks for us, even if they are picked green. Once the stem feels hard and dry to the touch, and the skin of the squash itself has hardened to the point that you can’t easily pierce it with a fingernail, it is good to go. Fleshy-stemmed winter squash like Red Kuri, Buttercup, and Sweet Meat, and many other cucurbita maxima varieties, seem to take for-ev-er, often a month or more. For these, you need to cure them until the bulbous part where the stem meets the squash is hard and dry, as this is where the rot usually starts.

a mark made by a fingernail in a spaghetti squash, demonstrating that it is not yet cured.
The rind on this spaghetti squash is still thin, and easily marked with a fingernail. It needs to cure longer!

Once it is completely cured, winter squash prefers to be stored in a cool, dry place. Many basements would be too damp, though if you have a dry basement or run a dehumidifier, it could work well. We often store ours in a spare room with the door closed and the furnace vent covered; our squash does very well in there. How long any given squash will store can vary quite a bit; this depends on the type of squash, your growing conditions, and your storage conditions. Generally, though, for us, c. pepo pumpkins are usually done by Christmas or shortly after, followed by small-sized c. maxima squash like Red Kuri, which usually last until February or March. Larger c. maxima squash like Sweet Meat and Mandan last quite a bit longer, until April or May at least. Spaghetti squash is the champion out of the varieties we can easily grow, lasting a year or more in good shape. We haven’t found any variety of c. moschata that will set fruit in our short season, but I understand that that species tends to store very well, also.

By Jess
An image of the author holding an antique glass 78mm canning lid in an antique zinc screw band.

This weekend, I started experimenting with canning with glass lids on my Gem jars.

In Canada, especially Western Canada, we have a unique size of canning jar, with a 78mm mouth. They were produced up until the late 1990’s or early 2000’s, and were sold under a variety of brand names, including Gem, Jewel, and Crown. Originally, these jars used a glass lid, with a rubber gasket underneath to allow a seal to form; however, when the metal lids became available, most home canners switched over to those. This blog has an interesting article on the history of 78mm mouth jars and lids in Canada.

A picture of an antique Gem 78mm quart canning jar and an antique Gem 78mm pint canning jar

I have a sizeable collection of Gem and Jewel jars. Some were inherited from family members, and others I acquired from yard sales. Even though the jars were discontinued before I ever started canning, I preferred them, because the 78mm mouth is a nice size for peach and pear halves, and the jars themselves have a bit of a shoulder that helps to keep canned fruit under the liquid. Plus, I could get them for a couple dollars a dozen at the yard sales, and I’m cheap. Up until this spring, you could still get new lids and bands for the 78mm mouth size in a variety of local stores, so I was happy to keep using them.

Unfortunately, Bernardin, the last lid manufacturer in Canada, discontinued the lids in the spring of 2022. They tried to discontinue these lids once before, in the early 2000’s, but there was such an outcry that they relented, and continued making them for another 20 years! However, it doesn’t look like they are going to change their minds this time. I got more than a little panicky about this, and asked my friends across the country to scour stores for the last remaining lids. I have a few years’ worth of lids, now, and plenty of bands, so I’m good for a little while, but with the price of canning jars right now, I was dreading the cost of trying to replace my dozens (hundreds?) of Gem jars with modern wide-mouth jars between now and when my lid stash runs out.

A picture of various lids for use with antique 78mm Gem, Jewel, and Crown canning jars.

I was cleaning in my basement late this summer, and came across a box that had been shoved in a dark corner since we moved here. In the box…surprise! A huge collection of the old glass Gem lids, with a big stack of the old deep zinc bands that were made to accommodate them! My mother-in-law had saved her glass lids when she switched over to metal ones, and must have given me her collection just before we moved.

This prompted me to do a little googling, to see if I could still get the rubber gaskets for these lids, and wouldn’t you know it, but Canadian Tire still carries them! I have also seen them at our local Co-op Grocery store and at Peavey Mart. They are sold under the brand name Viceroy, and are not at all expensive, so I’m planning on buying a bunch. From my internet research and from speaking with my mother-in-law, the gaskets can be re-used for years, until they get stretched or until they start cracking, which is also handy. Financially, using a $2 box of gaskets for several years is way better than replacing a $6 box of metal lids annually, so that’s another bonus to the glass lids.

Glass lids and Viceroy rubber rings for use with 78mm antique Gem, Jewel, and Crown canning jars.

Having gotten my hands on all the necessary parts, I decided to try canning with glass lids this weekend. Anecdotally, a number of my friends have reported that they have more seal failures with their Tattler reusable lids, so I thought I might run into that with the glass ones, too. I was doing a second batch of pickled plums yesterday, mostly because I needed to use up the plums, so a few seal failures wouldn’t be a disaster. Worst-case scenario, we could throw the jars in the fridge and turn the kids loose on them. Plus, with pickles, if I have a seal failure later, I’m less likely to end up with a fizzy, fuzzy mess in the pantry.

I found a couple of resources for using the glass lids – this youtube video shows you the process, and this blogger also goes through it, step-by-step, an a three-part series. Interestingly, the blog post noted that the modern bands can be used with the glass lids, which I did not know. I was a little dubious, since there is a substantial difference in the depths of the two styles of ring, but what the heck – I decided to experiment with that, too.

A comparison photo of an antique 78mm screw band to use with glass lids and a modern 78mm ring for use with metal lids on antique Gem, Jewel, and Crown canning jars.

What I did was scrub the glass lids very thoroughly with a toothbrush to get off any dust or goo, then put a rubber ring on each lid. I found that the rubber rings seem to have a ‘right way’; if one was fighting and not staying on well, flipping it over seemed to solve the problem. Then I put the lids, with the gaskets, into a pot, which I simmered on the stove while I made the brine for the pickles. It seems that the recommendation is to boil them for at least ten minutes; mine probably simmered for closer to half an hour, and that did not seem to cause any issues. I used kitchen tongs to grab the lid/gasket sets out of the boiling water and put them on the jars, which worked great.

A photo of 78mm antique glass lids with Viceroy rubber gasket rings on them, in a pot, ready to boil.

I filled my jars a bit less than I otherwise might; with raw pack fruit, I usually do that anyhow. When I put on the rings, I didn’t crank them down tight; I put them on snugly, then backed them off just a tiny bit. I got that from the recommendations for how to use Tattler reusable lids, and it seemed like a good idea. For my canner load of 7 pints, I used the old deep bands for 4 of my jars, and the modern shallow bands for the other 3. When the processing time was done, I turned off the burner and let the jars rest for 5 minutes in the canner. I haven’t seen this recommended anywhere, but I find it reduces siphoning, and it doesn’t seem to affect how the jars seal. Then, I took the jars out and tightened the bands down as much as I could. The shallow rings actually felt easier to tighten than the deep rings, which is interesting.

I was so excited to check my jars that it was hard to leave them on the counter and go to bed without fiddling with them. This morning, though, I went and took off those bands first thing, before I even had coffee! I took off each band, poked each lid a bit to see if it would move, then picked up each jar by the lid. I didn’t lift them far off the counter, less than an inch, but enough that the lid was taking the full weight of the jar. If it didn’t seal, or formed a weak seal, the lid would pop off, so don’t lift too far, or you could have a mess on your hands! My mother-in-law mentioned that her mom would also flip the jars over and watch for bubbles sucking into the jar, which would also suggest a seal failure, so I tried that, too, but I kept a couple of fingers over the lid so that the contents wouldn’t pour out if the seal was bad.

Two antique Gem pint jars of pickled plums, successfully canned using antique glass lids and Viceroy rubber gaskets.

Success! All seven jars sealed!

Seven jars is too small a sample size to tell if I will have the same failure rate with glass lids that I do with metal ones, which is usually about 1 jar failing to seal out of every 2-3 canner loads. I’d even be okay with a seal failure in every 1-2 canner loads, as I usually want to sample things anyhow, and we have plenty of fridge space. I also don’t know if the seals will hold as well or as long as they do with the metal lids, so I guess I will have to report back in a year or so, but for now, I’m happy to have a way to keep using my Gem jars.

By Jess
a stack of spaghetti squash - Rural Dreamsfrom our food storage

Yay! It’s May!

We’re creeping up on one of my favorite parts of the year – planting! We have a couple zillion fruit trees, grape vines, and perennial flowers either on their way or waiting in my seed starting trays, and I can’t wait to get them into the ground.

Meanwhile, on the food storage front, our root cellar veggies are mostly done. We still have potatoes that are firm and not sprouting, but they are bitter, and not tasty. There are a couple of little onions, which will likely still be good for another month, but we have essentially run out, and resorted to buying onions from the store. We also have a couple of maxima squash left (!), which I’m torn between roasting up before they rot and leaving alone to see how long they’ll hold out…either way, we’ll definitely be saving seeds from those ones!

Then there’s the spaghetti squash. That stuff is food storage magic. Still firm and tasty, after sitting on our kitchen counter since we harvested it in September. Now that the other squash is basically done, we’re instituting a roster of spaghetti squash meals – enchalada stuffed squash, spaghetti squash with feta and cream cheese, and squash with meat sauce are going to be in heavy rotation until it’s too hot to use the oven. Yum.

Spaghetti Squash - Food storage magic! - Rural Dreams

I’m expanding the food storage report to also talk about fresh foods that are in season month by month. For us right now, that’s a very limited selection…basically, just eggs, chives, and the early asparagus, for now.

The dandelions aren’t even up yet (we’re zone 2, maybe 3, and it’s still well below freezing at night), but we have a patch of chives and asparagus plants that are planted right up against the foundation of the house. Because the heat from the basement bleeds out into the soil, things planted there come up weeks earlier than anywhere else…meaning we’ve got lovely chive patches just in time for the beginning of the spring egg glut.

A basket of eggs - a seasonal spring food

Did you know that eggs are naturally a seasonal food? In the dark of winter, most hens will hardly lay anything at all, unless you have heat and artificial light in your coop. In December and January, we’re lucky to get a few eggs a day from our 25 (or so) hens – or none at all, if the hens are molting. Once the daylight hours go over 12 or 13 hours a day, though, the chickens kick it into high gear. Even though most of the hens in our flock are at least 2-3 years old, we’re still getting more eggs than we can really eat – we’re getting around a dozen eggs a day right now, and this will increase as it warms up and the days get really long.

The asparagus in the patch by the house was actually up about 5 or 6 inches, and I was eagerly eyeing them up, but it didn’t occur to me to harvest them before we had a couple of nights with -10 Celsius temperatures, so what was up is now a limp, rotting mess. There’s more coming up already, though, so it’ll only be a few days before I have my first taste of asparagus, likely served as a side to scrambled eggs with chives. I can hardly wait!

Asparagus growing out of the ground - seasonal spring food

By Jess

Who cares about rotting squashes, anyway?

Well, it’s actually kind of a big deal around here.

You see, we normally harvest at least 90 squashes and pumpkins of various types each fall, and most of those get stored to be used through the winter. Over the years, we’ve discovered approximately how long each variety of squash we grow will last in our storage conditions, and we use them up in that order. Pie pumpkins first, since they usually don’t last much past Christmas for us. Then the long-keeping c. maxima squashes like Red Kuri and Sweet Meat, which generally make it until March or April. Lastly, we dig into the Spaghetti squash, which seems to last virtually forever, or at least until our next harvest. I’m not sure if we’ve ever had a Spaghetti squash go bad on us, though one time we cut into one to find all of the seeds had sprouted!

Our little landrace breeding experiment, where we save cross-pollenated seeds and replant them, has added a new twist to our squash eating schedule. I assumed that since all of the parent squash were long keepers, that my F1 (first-generation) hybrids would store well. I was wrong. About half got rotten or soft spots before we even finished curing them.

A winter squash with a moldy seed cavity

It messes us up when things go bad out of order, or get gooey on the spare room floor. Not only is there the mess to clean up, but we also hate to waste the food. It’s kind of been a year for that, though. First, half the maxima hybrids unexpectedly went kapoot. Then, the pie pumpkins went and lasted until April. Now, some of my c. maximas are stealth rotting.

Of course, at the exact same time, some of our squashes have developed weird spots or discolorations that did not affect the meat at all, which has made it more difficult to identify which squashes are actually starting to go off. We had an exceptionally dry growing season, and grew some of our squash in a different spot than we have in the past, which may have caused some of the spots.

A winter squash with ugly spots that are not actually rot or mold

Usually, a squash that’s about to go bad develops little indented soft spots. This isn’t exactly rot, but it’s where the rot will happen. A lot of the time, on our squash, at least, it tends to start around the stem, or on the ‘shoulders’ of the squash. If we notice it in time, we use the squash right away, or roast it and freeze the puree for baking later. The little spots are hard to notice, though, especially if you’re not going looking for them. We know to look for them, and try to check the squash over at least once a week, but they don’t last long, and are easy to miss if you’re in a hurry.

A squash with a soft spot that indicates it will mold soon

Next, there is the mold. Usually, our squash develops a black or dark colored mold, often in several places at once. We have been known to cut out the moldy spots and feed the firm flesh to the chickens; we don’t usually eat it if it gets to this point, though you probably could if you were careful to cut a wide margin around the moldy spots. Often, by the time there is visible mold on the outside of the squash, the whole seed cavity is moldy, too, which is a shame, since the chickens seem to enjoy the seeds.

A black moldy spot on a rotting winter squash

If we don’t catch it at the black and spotty stage, the squashes tend to collapse into a gooey, smelly, disgusting mess that is no fun at all to clean up.

This year, we’ve had a couple of squashes go from looking completely sound to being a crumpled, oozing mess with no warning, whatsoever. They don’t smell, and there is little or no mold; it is almost like they froze and the insides liquefied, though I know for a fact that none of these squashes got more than a light frost at any point. Combined with this pumpkins-till-April thing, I’m kind of scratching my head. Maybe we’ve got a new type of mold in our garden, or maybe our growing or storage conditions were subtly different in a way that favors a different kind of rot than we’ve seen in previous years.

A squash that rotted and crumpled without warning.

Regardless, we’ve moved all of the still-sound squashes off the floor and onto something a little easier to clean up. We’re in the big push to use up the last of the c. maxima squash before they go bad, anyway, since they don’t normally last past April for us. We only have nine maximas left, which isn’t many; we’ll often use two of the little ones in a single recipe. We’ll roast them and freeze the puree, and try to sneak in a couple more of our favorite maxima dishes before they’re done for the season.

By Jess
a photo of what is still good in our root cellar in April

Here we are, the first week of April. Last month, I did a food storage / root cellar report for March; this is hopefully going to be a recurring feature. Here’s what we’ve still got in the root cellar (and other cold storage) in April:

Honeycrisp Apples: The apples were stored in ziploc bags; some in the root cellar, and some in the fridge. They were basically done last month, but we left the firm ones to check again this month. While they looked good on the outside, the insides were pretty brown. You could probably eat these in an emergency, but we chose to feed them to the chickens for a treat, instead.

Honeycrisp apples after seven months storage in the root cellar

Maxima Squash: We store our squash in a cool room, though with the sun really hitting the windows on the house now, the temperature in there is starting to fluctuate quite a bit. These squashes look to be some sort of Mandan cross, from our landrace breeding experiment. We still have nine good-sized (ten-ish pounds) orange winter squashes left, and they seem to be going strong, despite a number of our other squashes succumbing to sudden rot. They have a really waxy feel to them, which may have been what allowed them to store so well. We will save the seeds from these for replanting.

Sugar Pie Pumpkins: I am blown away by these. I have no idea why they are storing so long, but we still have three sound pie pumpkins (a couple have gone soft since March). Normally, the pie pumpkins don’t last much past Christmas. At this rate, we’ll have pumpkin pie for Easter!

Spaghetti Squash: No surprise here. These often last until the next harvest. We even store them on shelves in the (much warmer) pantry and kitchen, and they don’t seem to care. We have more than a dozen left, and are really just starting to use them now, as we run low on the other types of squash. I do notice that the spaghetti squash that were stored in the cool room are denser and heavier than the ones stored in warmer locations, which is an interesting thing that I will try to keep paying attention to.

Potatoes: Our potatoes are still firm, and not yet sprouting. They are starting to get slightly bitter, though. I don’t know if it’s light exposure (from the little window in our root cellar) or just age, but it does seem to happen to us every year in the spring.

Onions: Again, the only surprise with the onions was that we have basically run out. Onions store well for us, just loose in a basket in the cool room.

pumpkins, spaghetti squash, apples, onions, and potatoes after seven months in the root cellar

Our carrots are done, now, and I think we can call the apples done, though we’ll keep a few kicking around just to see what happens with them. Pretty soon, we will have spring eggs and early chives to add to our local food diet, and not too long after that, we’ll be enjoying asparagus and rhubarb. I’m excited about that, as we’ve tried to eat mostly seasonal vegetables through the winter, and I’m just a bit tired of root veggies, cabbage, and squash. The snow is just starting to melt off the garden, and in a couple of weeks, we’ll be able to dig up the parsnips and carrots we left in the ground last fall. We didn’t leave a lot for eating – we’re going to try to save seeds from these – but I might just try one or two to see how they taste!

By Jess
Pumpkins, squash, apples, potatoes, and carrots that have been stored since harvest.

I want to keep track of what we’ve stored, how long it’s lasted, and how our storage conditions have fluctuated over time, so this is the start of a (hopefully) monthly(ish) report. It’s pretty late in the (storage) year to start this little project, but I think it is worth doing anyhow.

We specifically plant a lot of our garden with an eye to long-term storage vegetables. Our house has a lovely, dirt-floored root cellar built right in to the north-west corner of the basement, and that is the backbone of our vegetable storage. However, a few of our veggies prefer dry conditions; we store those in a spare bedroom with the furnace vent closed off, so it is quite cool (maybe 10-15 degrees Celsius), but not at all damp. While we also store a lot of produce by canning and freezing, it’s nice to be able to simply put a part of our harvest away, without having to process it in any way.

As of March 1, 2019, here is what’s still going strong:

Sugar Pie Pumpkins – these are a surprise to me, as the pumpkins usually get soft by late December for us. We stored them in the spare room, same as always; the only thing we did differently this year was dipping the stem ends in a bleach solution before bringing them in the house to harden off. We had one for supper a few days ago, and it was still perfect.

Red Kuri Squash – the Red Kuris usually last until sometime in March or April, so it’s not surprising that they are still doing fine.

Sweet Meat Squash – this is another variety that has a good shelf life for us.

Various cross-breed c. maxima squash – we’ve been doing a little breeding project in our garden, trying to come up with an improved c. maxima that will tolerate our short, often droughty seasons, taste good, and store well. We have a handful of squashes left that seem to be going strong; we will save seeds from these ones, for replanting in the spring.

orange winter squash

Spaghetti Squash – spaghetti squash is always a particularly good keeper for us, and they don’t even seem to care whether they are stored in warm or cool conditions. If we run out of space in the spare room (we usually do), the spaghetti squash goes into the pantry, or even on shelves in the kitchen! This year, we’ve got spaghetti squashes all over the house, and they are all still perfect.

Onions – our onions typically last until the chives come up in the spring. This year, we didn’t plant enough of them, and have had to supplement with store-bought; however, the few teeny onions we’ve got left are keeping just fine. We usually keep our onions in baskets in the spare room, though this year, they got moved to the basement around Christmas, because they were in the way.

Potatoes – potatoes are another long-storage champ for us. We have tried numerous varieties, and they all seem to keep very well. Our current potato stash is still going strong, and they normally hold out until sometime in late April or early May, when they tend to sprout and get bitter. They don’t rot, though, and are generally in fine condition for replanting by the time we’re ready to do so. We store the potatoes in burlap sacks in the root cellar.

Carrots – this year, we tried storing our carrots in perforated plastic vegetable bags in the root cellar, and they stored for considerably longer than they have in the past, when we put them in covered plastic bins. We also tried storing carrots in bins of sand, but that didn’t work out well at all – I suspect the sand was too dry, as the carrots shriveled up in just a couple of months. The carrots are starting to go a bit limp, now, and sprouting green tops, but they still taste fine.

Honeycrisp Apples – most of the Honeycrisps were stored in regular zip-top plastic bags and perforated vegetable bags in the root cellar. We didn’t do a good job of sorting through them over the winter to use up the ones that were going bad, so it’s hard to tell which type of bag was better for storage. However, the bags have held the apples much longer than last year, when we stored the apples in uncovered five-gallon buckets in the root cellar. We also tried storing some in a bag in the fridge, though the bag was not zipped tight. Most of the apples from all three storage methods are shriveled to some extent, though a handful are still quite firm.

A Honeycrisp apple that is still firm after almost 6 months in a root cellar

All of the apples I cut open had some extent of browning on the inside, but the majority are still edible. All were sweeter in flavor than they were in the fall, but the ones in the fridge had a stronger flavor and a somewhat better texture. While mealy and not exactly ideal for eating raw, the apples are still mostly edible, and could be used in a pie or crisp or porridge.

All in all, I’m pretty happy with the veggie storage this year, as we managed to extend our storage season on several things. The pumpkins, carrots, and apples, in particular, are big wins.

By Jess